the pixel lab is an interesting resource for me to indulge myself and find out more about the industry. It is an arts / creative resource website.
The website offers free tutorials, interviews with various motion designers (both shown in previous PDP tags i have posted)
Camera Shader which will map any camera view onto any surface, improved MoGraph Effectors, and other general improvements and refinements
The Camera Shader is a little plugin which can be linked to a standard C4D camera object. It then displays everything that is viewed by this camera. Thus you can e.g. make an object like a TV in your scene show some image sequence over time which is defined by a normal camera.
Of course you can also just use it to make nice effects like fractals or other funny patterns by directing the input camera to the output shader itself.
There's the possibility to change the behavior of the camera shader in such a recursion: either the normals of the objects are evaluated only once and ignored in further recursions (see "No effects" - diffusely distributed normals stay diffuse). Or the normals can be re-calculated in each recursion step which causes effects like seen on the images "effect".
Interview with Jake Mathew a freelance motion designer freelancing in the cicago area.
How did you get into your first job in the industry?
Landing my very first motion graphics job was difficult. A lot of students want to become motion graphic designers so there was a lot of competition. It is hard to get a job without a demo reel. But, it is hard to have a demo reel without working any jobs. It was a Catch-22 situation.
So in order to start building up a portfolio of work, I treated every class project and assignment as a potential spot for my reel. After about a year of grad school, I had enough work to create a 30 second demo reel that I could send to companies. Thirty seconds may sound really short, but I made sure to include only my BEST work.
I landed a job as a motion graphic designer at a local post production company. I spent my final year of grad school working there between classes. The types of projects I worked on at that company were just local and regional TV commercials.
Jakes work:
Tell me a bit about where you work and what they specialize in. Are you at a studio? Freelance?
After I finished grad school, I got a job as a motion designer for the TV channel, Current TV. While a lot of people are not familiar with Current, they have a really talented in-house graphics department and I learned a lot during the 2 years I worked there. After Current TV, I moved to Chicago and have been freelancing at post-houses around the city.
How long have you been in the industry?
About 6 years.
What software do you use?
I use the Adobe Creative Suite and Maxon Cinema 4D for everything I do.
Advice Jake Mathews had to say about getting started and where to focus attention in your work:
While you are in school, take courses that will improve your design-sense. Learn about typography, color theory, composition. Good design never goes out of style.
Build a solid demo reel. Take your best class work and place a few seconds into it. If you have any freelance projects or personal projects that you are proud of, use that. Get a nice web portfolio together. Sending a web link to your demo reel to companies is going to be the way you get a job. Don’t worry about creating a DVD as most companies prefer viewing it on the web so they can easily email it around or bookmark it if they like it. Quicktime files are preferred.
Each year, you should be a better designer than you were the year before. If you stop improving, change something.
Tutorial showing how to create realistic lighting using cinema 4d. This was helpful for me when i was creating my 3d realistic text in real footage photograph. I needed my text to look as 'real world ' as possible and so the lighting played a large role in this. This is somthing i need to remember for when i come animating any of my work as lighting can change the way my work looks and how it is perceived. CINEMA 4D is a 3D modeling, animation and rendering application developed by MAXON Computer GmbH in Germany. It is capable of procedural and polygonal/subd modeling, animating, lighting, texturing, rendering, and common features found in 3D modelling applications.
Motion graphic design is a subset of graphic design in that it uses graphic design principles in a filmmaking or video production context (or other temporally evolving visual medium) through the use of animation or filmic techniques. Examples include the kinetic typography and graphics you see as the titles for a film, or opening sequences for television or the spinning, web-based animations, three-dimensional station identification logo for a television channel. Although this art form has been around for decades, it has taken quantum leaps forward in recent years in terms of technical sophistication.
Technology
The elevation of this art form is largely due to technology improvements. Computer programs for the film and video industry have become vastly more powerful and more available. One of the leading program used by motion graphic designers isAdobe After Effects, which allows them to create and modify graphics over time. Adobe After Effects is sometimes referred to as "Photoshopfor film." A relatively recent product in the market isApple Inc.Motion, now a part ofFinal Cut Studio. Adobe Flash is widely used to create motion design for the web.
Recently, motion graphics design needs more than a few tools and practices to be created smoothly. Tools like Maxon Cinema4D has integrated tools to create Motion Graphics, such as the native MoGraph plugin, or ICE of Softimage that can also be used for similar purposes. While techniques used are heavily dependent on the designer, trends are also defining on which techniques are used, when.
A typical motion designer is a person trained in traditional graphic design who has learned to integrate the elements of time, sound and space into his/her existing skill-set of design knowledge. Motion designers can also come from filmmaking or animation backgrounds.
For this brief i am going to be looking at noticing something i have never really thought of or paid attention to before. I will ask question such as what is it why is it there has it always been there, when looking for my subject matter. My subject matter could be somthing i have walked passed a thousand times and never given it thought.
I will explore unconventional ways in which my subject matter will be viewed, and involve various editing techniques to change the view point of the viewer and atmosphere of my film.
To start off my idea for this project i will take picture and records of things i discover that could be interesting or that spark ideas for my work.
My final outcome of this project will be a 2 minute short film which includes sound and editing technique applied in ways which work well and even emphasise my theme and idea.
In the years between the Russian Revolution and the rise of Stalin, filmmakers in the Soviet Union invented a new language of film: one that still inspires filmmakers today. Geniuses like Dziga Vertov and Sergei Eisenstein found out how to combine and contrast images to get ideas across, and how the rhythm and pace of editing, and the use of music, could stir emotions.
Most modern films follow the ‘continuity system’ (see Putting it together) so that viewers get caught up in the story and don’t notice the filmmaking. Soviet montage is completely different and offers lots of ways of giving your films impact and making the viewer think about your ideas.
How it started
After the 1917 revolution, fresh film stock was in short supply, so filmmakers learnt by experimenting with found footage (shots from old films), looking at what happened if they put them together in different ways. They found that people would respond to a shot differently depending on what images came before and after it. In the “Kuleshov experiment” by pioneer film theorist Lev Kuleshov, audiences saw a close-up of an actor followed by a shot of a bowl of soup, a coffin, or an attractive woman. They thought the actor was great at looking hungry, sad or lustful – but actually each of his close-ups used exactly the same footage:
The Russian Revolution meant that there was a huge demand for propaganda. Revolutionaries like Lenin thought film was the ideal way to get revolutionary ideas across to people who couldn’t read.
The 'film man with the moving camera' includes practicalling al of the editing and cutting teqniques used in modern film today. It was a film that made the viewer aware of the film being a movie rather than trying to appear to be real life on screen.( i was unable to show an example of this as the only examples i could find were an hour long).
The starting of this video shows in itself a form of film editing and use of cutting to present an overall message all the actions are varied however all cut something with a similar sound effect in one way or another. The video discusses the value of film cutting and editing and the relevance to the way we see films today. The video describes how cinema and film was first talked about in a way where it was described as eventually dining out. The introduction of cutting gave film more depth and made the audience think more by showing clever suggestive connections in the film but also showing other view points of a scene.
When making my short film i should think about camera angles similar to how i thought about them in my first narrative storyboarding task 'making an egg'.
I will think about extreme close ups, low camera angles, wide shots, midd shots, establishing shots (setting the scene), miss en scene of my shot (creating an over all appearance and theme in a shot) etc I will also think about ways in which i move the camera to create different effects for example panning of the camera to show or reveal elements in my film, shaking of the camera (works for representing a point of view fall or intense action) zooming in to something to create a slow focus on the subject.
On top of the this the 'Cutting aspects of my film i will also give good thought to as this can make or break my film with regards to how creatively i can incorporate it in the end.
This video i have placed on my blog shows examples of various forms of video cutting and edits.
Some examples i have looked at:
POINT-OF-VIEW (POV) SHOT: A shot which represents what a character is looking at. It is seen more or less from his/her perspective and thus often increases the viewer's emotional identification with that character. A POV shot usually follows a shot of the person (whose view it represents) looking off-screen. This set up is often referred to as "motivated Pov."
PARALLEL ACTION: An effect created when two or more actions in two or more different locations are presented by CROSS-CUTTING between them. This alternation between actions proposes to the viewer that they are taking place at the same time. Also called PARALLEL EDITING.
PARALLEL EDITING: see PARALLEL ACTION.
REVERSE MOTION: Screen action that runs backwards.
MONTAGE: The French word for editing. In the Soviet Union daring the 1920s and 1930s, montage meant INTELLECTUAL MONTAGE. 2) In Europe, the term is equivalent to editing. 3) In Hollywood, the phrase "montage sequence~ is used specifically to describe a sequence using rapid cuts, often SUPERIMPOSITIONS and DISSOLVES, to create a kind of kaleidoscopic effect and to telescope or shorten the passage of an extensive period of time.
SHALLOW FOCUS: objects on only one plane are in focus, while objects in the background or close to the camera are out of focus
I also found some editing techniques in a library book i read and recorded my findings. The book gives an example of the type of edit and an example (what films it has been used in) and a picture example:
Importance of storyboarding when creating film:
As i have decided to follow a narrative themed film in which i myself will plan, i am going to make sure that my story boards are very accurate in order to keep track of what shots and various angles i will need for my sequence and where everything needs to be how long for etc this will make things easier for me to manage when filming.
Narrative Pairs images:
For my Final idea for this projects i have decided that i am going to create a short story that highlights the forgotten aspect of discarded notes. My idea was inspired by the abandoned sticky note that i recorded when doing my research. I have decided i am going to follow a narrative the focuses on an actor writing and scribbling notes that they will then keep discarding and to express and display frustration in some way to emphasise this idea of the notes being discarded and the thought of the words the actor writes becoming ungracious in the eyes of the actor leading this person to abandon them.
I will look at unique ways of creating this short film with my use of angles perspective camera movements and lighting all of which will contribute to the atmosphere of my piece.
I have storyboarded my idea in my sketchbook and written about what props etc that i will need and created a shot list for my short film. Some of the story board windows i have altered when i have actually come to filming my short film do to on set technicalities and i decided to change the ending slightly but still end on a shot of the pencil i have done this to leave the film on a more eery intriguing note and suggestive.
My First version of my film with no editing and no sound:
This is the final edit of my short film with the added sound:
b
The idea of this short film that i was trying to portray was the discarded notes that symbolise memories and personal documentations etc due to writing in a diary this is similar to the quality and emotion my recordings of the discarded postit note gave which was what lead me to embrace this narrative themed idea for my work. The main aspect of my work relating back to the project brief itself was how i decided to film the film. The brief was for us to capture something in a new or unique way and so i did this by using close up obscure angles and various shots and transition techniques from one scene to another. I also included the placement of short suggestive more dark and gloomy shots where the actor in my film would have rubbed make up and show obvious signs of stress and anger, emphasising the personal quality the disgraced notes hold as the film progressivly shows her getting more and more angry as she throws away more and more notes in which she is pouring her heart into, losing a piece of herself each time she trows another.
The shake camera movements in some of the shots create a more real feel about the film and give it that more personal feel (less staged). Also the editing adjustments i made to the film emphasised the dreamy hazed effect of the nature of the film.
The i i used in the background is called Bad dream by soley. I chose this piece of music to use for my film as its nature is very sort of dazed and dreamlike with a hint of insanity or verge of insanity. This is the along the lines of the emotions and narratives i am following for my film.
I also recorded and involved my own pencil writing sounds for the film as this emphasised the continuous writing of the actor as the audience can not only see but hear her writing with the sound repetitive.
On top of this i also added darker sounds on top of the sole song where the dark pieces of footage were displayed for example when the first scene of the throwing of the paper appears i make dark eery chimes play underneath the song more quietly so they don't over power but again emphasise the dark section and suggestive nature of this part of the film, also at the end of the film i have done the same.
the music i had i made match up with the footage itself for example i lined up a section of the song that says the lyrics i was frightened, with a shot of the actor holding her face in a concerned way. i also left a big pause when the first paper ball was thrown to match up with the camera technique of the pull focus and to emphasise a drag of time and new scene.
For this project we have been asked to work as a team to produce a piece of promotional material for the Ba Hons Motion Design course. We will identifies the courses key strengths and use this to promote the course in a positive way. we will develop the main story board together and will each be responsible to creating a section of the animation and individual storying boarding our work more intricately. We should however show a full range of techniques mediums and methods that we have learnt of the course, such as stop motion pixilation after effects work, video edits, cinema 4d work and live footage camera work and lighting.
Motivational Teamwork Video:
The main aspects we wanted to show in our work was growth, creative freedom, teamwork with the creativity being emphasised.
We brainstormed our ideas together and drew mock up story boards of the ideas we came up with to explain it to the group.
we then made a full rough version of our story boards placed together so that we all knew how the piece would look and what we all had to do. This also made it easy for us to spot which parts of the story boards we might have to tweak in order for the transitions to work between sections of the animation.
We did a lot of creative exercises to brainstorm idea and creatided physical story boards to pin our ideas down. I have brainstormed most of our idea development in my sketch book and included evidence of some of the creative exercises we did in it.
Exquisite corpse exercise:
for this exercise we had to draw on sections of the paper and the fold it over and pass it on for the next person to draw on. This meant that the outcome would be random however we would leave marks indicating where the next part of the drawing would go so that the drawing when finished is connected well. We drew the corpse going down as it would be, drawing a head then folding it over then drawing the body and folding it over and then drawing the legs and feet.
Exquisite corpse, also known as exquisite cadaver (from the original French term cadavre exquis) or rotating corpse, is a method by which a collection of words or images is collectively assembled. Each collaborator adds to a composition in sequence, either by following a rule (e.g. "The adjectivenounadverbverb the adjectivenoun", as in "The green duck sweetly sang the dreadful dirge") or by being allowed to see only the end of what the previous person contributed.
Exquisite corpse example:
Lateral thinking is solving problems through an indirect and creative approach, using reasoning that is not immediately obvious and involving ideas that may not be obtainable by using only traditional step-by-step logic. The term was coined in 1967 by Edward de Bono.
We decide that for our animation our theme is going to be following the theme of the title we will start with of 'lets get the gal rolling' and the animation will follow the ball rolling through out different environments becoming digital or going into realistic environments this will show our range of techniques and keeping the idea of traveling on a journey of creativity as we display the interesting ways in which we will transition our shots and connect them as well as how we adapt and move the ball through different environments.
What each of us are doing:
Me- opening title, stop motion showing hands arranging scraps of paper to make the words 'lets get the ball rolling then moving together in a scrunched black gal of paper
Hannah- Draw ball (black and symbolising scrunched paper) rolls towards drawn character.Screen angle moves on its side and ball rolls down and falls off the bottom of the screen
Olivier- ball drops down and is then kicked about by a character made in after effects, character then kicks the ball to the right of the screen and goes off screen
Steph- (using stop motion on white board) ball comes in from left and then interacts with drawn characters and is eaten by one of the characters making screen completely black
Niaeem- (live footage film noir) black screen then beam of light from spotlight illuminated real life ball on a table and then shows actors interrogating each other then close up of the ball
Jamie- Close up of ball in cinema 4d then camera follows the ball moving quickly through a pinball machine hurts out of the side of the machine then drops down.
Danny- ball falls down from sky in after effects
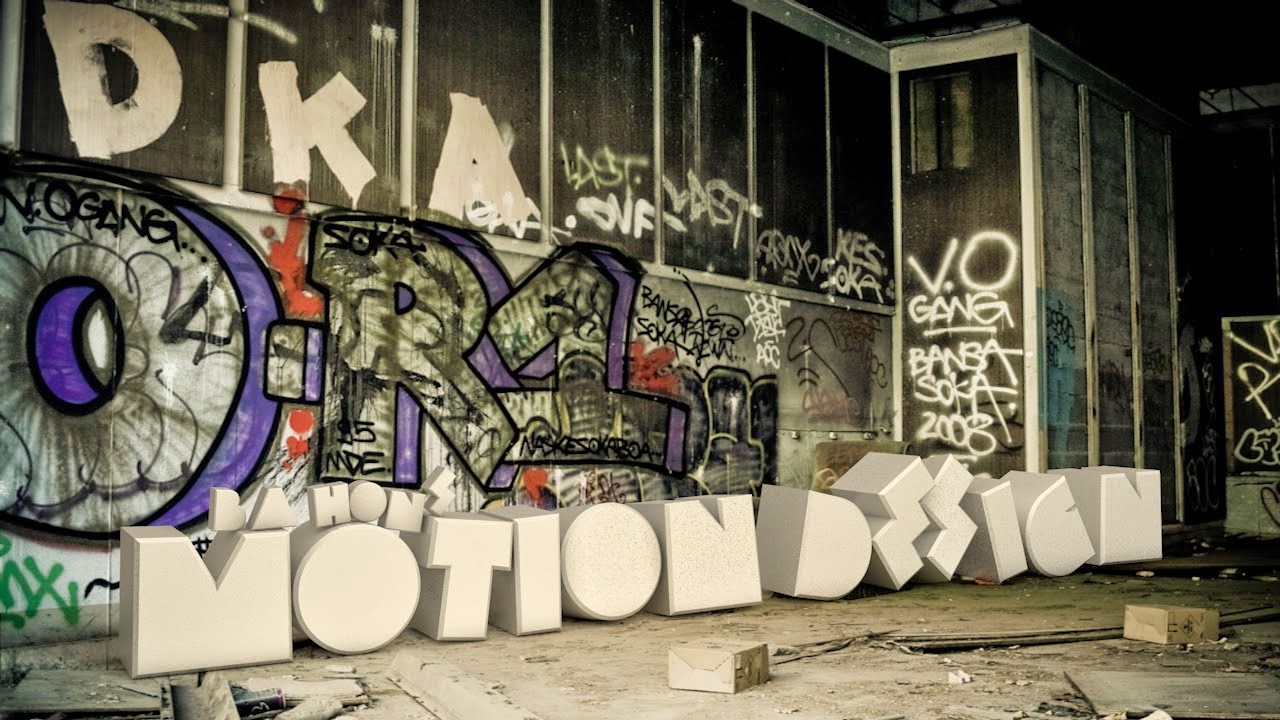
At the end of these sections we will then have 3d text that we will each make in cinema 4d saying Ba Hons Motion Design one after the other and then will finish with the text Stockport University.
So with all of these sections involved this will show a variety of techniques such as stop motion pixilation in real life (my stop motion inclusion of hands makes this pixilation). Physical drawings of frames to create footage (hannahs drawing section) after effects character animation drawings (olivier) (stop motion drawings (stephs) cinema 4d (jamie) Live footage and lighting techniques (nayeem) and after effects techniques with Dannys creation.
The message and effect of this when finished is showing the audience the creative and educational journey of the course and representing what we as students have experienced and our journeys in a way. It also shows a variety of techniques and specifications that people could take. It shows a playful and fun environment as the animation we are making is not serious and has funny playful sections especially with some of the drawing sections and shows swell impressive 3d creations such as jamies c4d section where he has digitally built objects that react and move with realistic qualities.
My section of the animation will be the opening sequence where we display the words lets get the ball rolling. I am going to be creating this title using stop motion that shows hands arranging paper scarps into the words and then the words morph and scrunch together into a paper ball which then starts rolling and travels into the the next section.
My 3D text:
Getting to grips with cinema 4d:
I did a workshop where i created a snowman out of shapes on c4d and using the tools. I also created lighting for the piece and created an environment with the floor and added colours and materials that my snowman is made out of.
I used this tutorial to help me create my 3d text as my idea was to add text into real life footage.
after watching a couple of tutorials online i decided i wanted to create my 3d text onto of a photograph so that it would look like it is a part of the photograph and 'realistic looking'
I chose this image to place my text on as it has an urban feel and i would like to try perhaps blending graffiti onto my text to match its environment.
The first stage was positioning the text so that it looked like it sat in the environment. This meant getting it at the right angle and scale.
I added a plane (floor) so that my text would have shadow beneath it but also so that i could animate my text in order to make it fall and look slightly less straight lines organised and neat (as this did not match the nature of the environment)
However the result of this i felt was a little too unorganised and wonky and made the words hard to notice well seeing as this had to be fairly easy to make out what the words say as it will be on at the end of our group animation along the with other text it will only show for a couple of seconds, so i needed to change this.
I decided to rotate and move each letter individually so i had more control over how each letter would fall in its place. I then did some compositing to make the lighting more realistic.
This is what i came up with at this stage:
I decided to experiment with colour to see what effect it would have on the appearance of my text however for the purpose of the brief decided that white was the best colour as it stands out most as white and is more easy to read seeing as the image will only be visible for a few seconds.
Adding the appropriate lighting to create realistic shadows and to make it more yellowy to match the environment and adding texture to the text (again to make it look more life like:
Testers:
After doing these test animations i decided that to simply place all the letters with my hands in an ordinary way was deleting the point of using stop motion and may as well just be filmed so i decided that for each word i would create it in a different way making each one look like it could not happen in real life and so holding more unique quality and interest also this is a better way of displaying the skills learnt with stop motion and would be more suited for the task i am doing.
Research:
This video shows techniques and similar aspects to what i will be creating for my section of the animation such as the paper crumpling into a ball by itself and the involvement of the persons hands in the animation and so would be a good video to refer back to when I'm coming to create my stop motion.
Watching how a paper ball moves for when i come to do my animation:
Setting up the work space for the stop motion animation i am about to create.
Time lapse of me creating the first two words for my stop motion animation:
First Version Of My Piece (unedited):
(original higher quality version in hand in folder)
This render shows my animation with out the ending transition where i am supposed to finish with the paper ball rolling off the right. This is because i did not have enough time to complete this and will finish that section off next time when i am finalising the animation.
After making this animation its appearance was avery dull and blueish due to how it was lit so i decided to take it into photoshop and change its appearance slightly by making the animation brighter and slightly warmer.
Final version with sound:
This is the finished section of our group animation that i have made myself. This still needs to be pieced together with the rest of the animation as the opening sequence. I have cut out a small section of my animation from how i had originally filmed it (the part where the paper ball folds right out into flat paper) as i felt this was too distracting and made the contrasts etc over exposed compared to the other frames. I felt that i did not need the paper to entirely open, just to demonstrate that the pieces of small paper had joined together. I used realistic sounds mostly in my animation however some of the sounds i used are more comical than realistic such as the ping noises when the hand makes a word appear this is to exaggerate the trick and the unrealistic nature of these parts of the animation. I recorded my own sounds using a variety of papers and appliances (microwaves, bike bells, balloons).